Hey blog readers, Nathanael here from the Thermaltake AU marketing team, and I’ve got a confession to make – I’m not an expert on custom liquid cooling or PETG tubing. I’m actually pretty far from an expert. I’ve done plenty of work with air cooling and maximising air flow, I’ve used more all-in-one coolers than I can count, but only a few LCS loops, and most of those were with flexi-tube.
The reason I’m making this somewhat startling confession is that I’ve had to learn very quickly how to properly bend tube and set up a liquid-cooling loop. Thankfully the other guys in the office are very good at this sort of thing, so they’ve taught me everything they know about bending PETG tubing.
Through the process, I was thinking about the common mistakes you might make, and if you’re just having a crack at your first LCS build, or looking to increase your skills, here are a few things to keep in mind when working with PETG tubing.

Kink your bends
The first few times you’re bending PETG tubing it can be pretty tense, there’s heat involved and you have a limited number of supplies. But thankfully for me I have experienced folks around to help me out, as well as the tools to keep my bends in line. Fingers crossed I can pass on some of what I learned here.
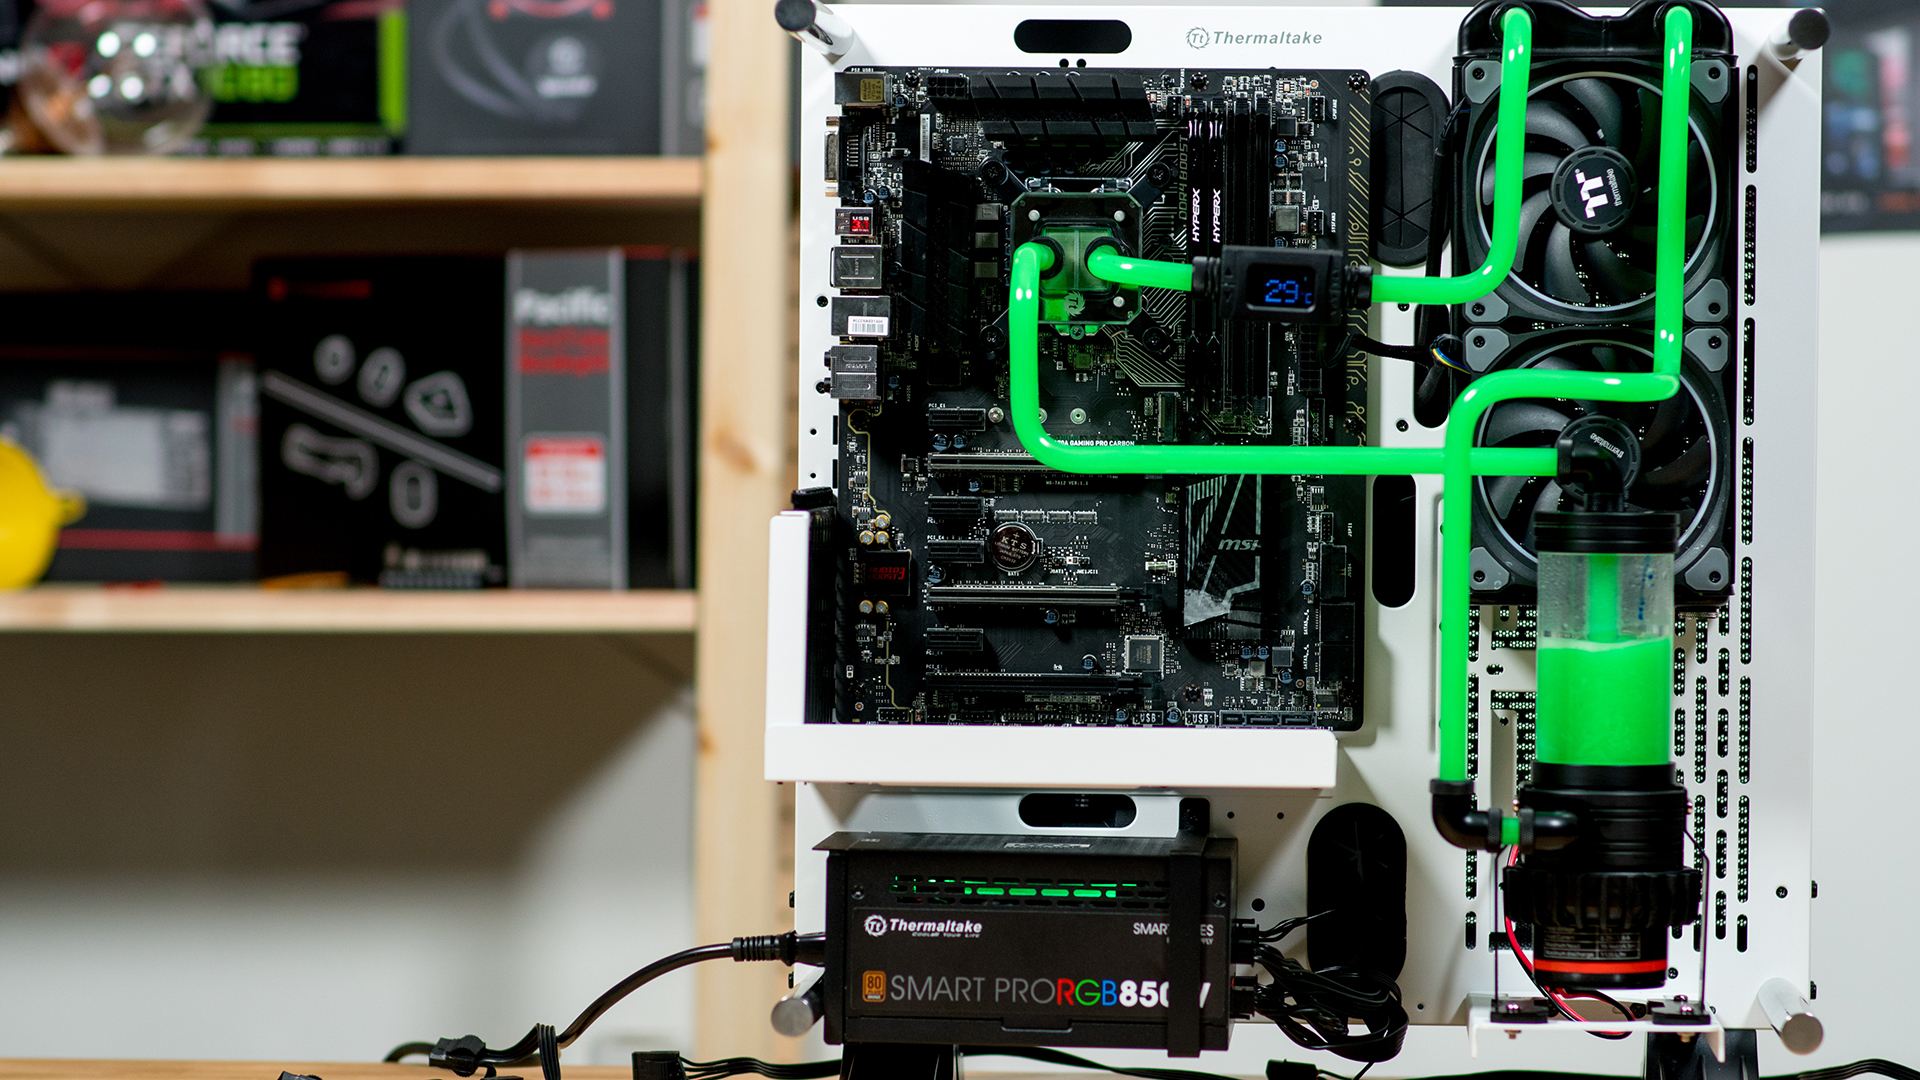
We used our Pacific Hard Tube bending kits to ensure we nailed all our angles and left as little up to chance as possible. These kits have angled mandrels that give you 90°, 180° and 360° loops, as well as a silicone insert that you put inside the tube to help it keep shape.
But even with the best tools you can still make mistakes. Kinking usually happens when you put too much pressure on the tube as it’s cooling down. That could be pressure in a number of directions, maybe you pushed the tube out of shape with your thumbs when bending it, our maybe you pulled too hard when making the bend.
Temperature is a huge part of bending tube, so taking your time and trying to heat your bend evenly can save you a headache.
PETG tubing begins to be malleable at around 62 degrees celsius, and melts at 260 degrees, so you have plenty of room to work with.
You can very easily create a kink in your tube if you underheat the plastic, or create bubbles and blisters if you overheat. For this reason, heating on a lower setting and using your distance away from the heat gun (rather than cranking the temperature) to control the levels can help you heat the plastic more evenly.
Bending tube is all about consistency and patience, the trick is to take it slow and use the time you’ve got.

Lose your silicone insert
Once you’ve done some basic bends and nailed the right angles in your build, you’ll probably want to do something a bit more complicated. For me that meant that I wanted to create a spiral piece of tube, like a curly pig tail across the front of our Core P3.
The guys in the office decided to let me have a crack at it, which was a matter of heating the pipe and gradually curling it around a cylindrical shape. We used one of the mounting brackets that holds the Core P3 acrylic panel in place. The bending itself went fine, I heated the tube slowly and bent it around the pipe little by little to make sure it didn’t kink.
Only after finishing that bend and pulling the spiral tube piece away from the pipe did I realise that I’d made a mistake. It looked amazing, and just what I wanted to create. However, the silicone insert that I’d used to help the bend keep its shape had become lodged inside the bend, and no amount of pulling could get it out.
It makes sense really, you use the silicone insert to stop the tube from kinking or collapsing, but the more bends you put it through, the more tension there is when you try and pull it out again. The trick here when doing complicated bends is to stop between bends, pull out the insert and work on each section one piece at a time. Otherwise, if you’re planning a particularly complicated bend you can always coat your silicone insert with soap before making the bend to make it easier to remove. Just remember to thoroughly flush out the loop before using it if you use this method.
With those tips, hopefully you won’t get stuck like I did and have to cut your masterpiece apart to retrieve the silicone.
It was a truly harrowing experience.

Mix up your measurements
When all is said and done, the PETG tubing in your new liquid-cooled setup needs to do two things – complete the loop, and not leak. Solving both problems comes down to checking, double-checking and triple-checking your measurements to make sure there aren’t any gaps or breaks in your loop.
There are a whole host of options available to you if you realise you’ve cut a length too short of too long. If it’s too long, you should be able to trim down either end where the tube meets the attachment until it fits.
If it’s too short and you’ve used up all your PETG tubing, you can try using connectors or right-angle fittings to cheat the last few small bends to the end. This means connecting those fittings, lining up your tube and then remeasuring and cutting the tube again until it fits.
If you look closely at the Core P3 build we photographed for this build you can see we used this technique to connect the tubing to the bottom of the reservoir. We used two extra right angle bends and an offcut piece of tube to cover the last little gap and connect it all up.
Remember, its always better to cut the piece too long, so that you can cut it back little by little. You can always take more off, but adding more on is hard.
So that’s how I started bending PETG tube. Hopefully, you’ve learned a thing or two from reading this. Let us know if you have tips to share or if this helped you at all.
When it comes down to it, setting up your first liquid-cooling loop is all about planning. Check your measurements, work slowly and where possible always try to have too much material, rather than too little.

How tight of a bend can you do with hard tubing, I have a artistic idea but would require some sharp turns
Hi Andrew!
It depends on the thickness of the tubing you’re using really (whether it be 12mm or 16mm etc). Overall, you can pull off some pretty tight bends, however you probably would struggle to say, bend it all the way around and end up with the two ends right beside each other for example. We are looking at doing a YouTube video on PETG tube bending soon, so keep an eye out for that as I’ll endeavor to get your question answered there also. Good luck!
Sarah
I’m working on my first hard tube build (technically 2nd, if you include the straight pieces I used in my first phase of testing, using a mix of soft and hard tubes), using a Thermaltake P7, which effectively turns my arcade cabinet into a PC Case – albeit a 6+’ one.
One of the issues I’m seeing is that my bends appear scuffed on the inside angle…I’m trying to determine if this is because the silicone insert is dragging on the soft plastic.
I’m using the 90/135 mandrel, which should cover all of my bends, and I’m using 2 blocks of wood to apply pressure to ensure a precise and tight bend. The blocks are on the cool part, so don’t leave any marks, in my tests. So, I’m hoping that using a lubricant on the insert will reduce the drag, and leave a clean bend end-to-end.
Thanks for this article.
Hi Laggerific! Thanks for reading the blog!
I had a chat with our official water cooled PC builder about your comment, and he has some ideas for you!
He’s not entirely sure what’s causing the marks, but doesn’t think the silicon insert would be unless it had something stuck on it (e.g. sand or dirt). So, first he suggests to clean it with soapy water, then see if it goes away. If this doesn’t work, try coating the silicon insert in soapy water, then while it’s still damp try bending with it. This will make it slippery and definitely won’t scuff the tube then. He also suggests trying to bend without a mandrel, as that may be causing marks that look like they are on the inside, but are actually on the outside.
Fingers crossed one of those suggestions helps you! Feel free to comment again, letting us know how it went!
All the best,
Sarah
Thank you for the follow up!
Reporting in on my tests, following your suggestions, it does appear that the insert is causing most of my cloudiness.
To recap: I first tested with a clean, dry insert, and it came out cloudy again.
Next I tried with soapy water, and it came out very nice, though I did see some external markings, which appear to align with the finish of the mandrel. This I could probably live with, as it still looks fairly clean.
Finally, I tested without the mandrel, thanks to a generous customer service rep at Rockler, who provided me a very nice, precise 90 degree board from their sample pile (initially planned to help with precise 3-D bends – 90 degree vertical to 90 degree horizontal). This test was without soap.
Conclusion: I need to use soap, as without it I couldn’t avoid cloudiness (I’m curious if I waited for the tube to cool absolutely before pulling, I could eliminate this further). And I think I’ll avoid the mandrel for 90 degrees, but will use it for the 135, as it looks pretty good, but the bends with the wood board I used were nearly pristine.
Now, on to my next challenge – how to hit my measurements with multiple bends.
Thanks again!
I finally completed my Thermaltake P7 arcade cabinet PC case build. This was my first hard tube build, and I am very grateful for the super long tubes that Thermaltake makes (and why I went with PETG here), which made this build possible.
I ended up using some supports at the bottom, to help ensure the long runs were stable. I then used a board with some relevant artwork to hide those as best as possible.
As for the tube marring from the silicon insert…I likely hadn’t been letting it cool long enough. That helps a lot, though I used soap just to be certain.
Probably the biggest issue I had was trying to get precise measurements for the long runs, but at the end of the day, it easily blows away my temporary soft tube setup that I was running while finalizing the hard tube plan.
Thanks for a great PC case to help realize this build, and the pacific hard tube kit that made working with the tubes a breeze.
Here is the final result:
https://ibb.co/k3y15DZ
Apologies for not getting back to you for a while Laggerific! But your build looks amazing! I am really glad to hear it all went well in the end and that our tips came in handy! I will pass the image onto our builder Nick too as I’m sure he’s curious to see the result. Thanks for sharing! 🙂
Going to start my water loop in a couple of weeks and have been reading everything I can. One thing I think that a lot of builds could get help from is the use of a plumb bob. It would give you a physical precise location instead of a abstract general one. However keep in mind that I am unbelievably sphincter related when it comes to square and plumb. This is my ocd. I plan on heating the tube to 80c and going from there to see what the best actual bend temperature is. No one seems to know. That question lead me here. Thank you for your article.
Hey Ian! Thanks for checking out the blog. Very exciting to hear that you’re gearing up to do a water cooled build! Feel free to comment again letting us know how it goes, we’d love to hear. Best of luck with it!